Update & Upgrade
sudo apt update && sudo apt upgrade -yInstall Apache
sudo apt install apache2 -yAgar Apache auto start pada saat startup ketikkan perintah.
sudo systemctl enable apache2sudo systemctl restart apache2Coba akses via Web Browser.
http://IPADDRESSInstall PHP
sudo apt install php -yInstall modul PHP yang dibutuhkan (ini tergantung dengan aplikasi web yang digunakan)
sudo apt install libapache2-mod-php php-common php-bcmath php-mbstring php-mysql php-tokenizer php-zip php-curl php-gd php-mail php-mail-mime php-pear php-db php-xml php-json php-imagick imagemagick php-intl php-gmp php-cli php-ldap -yInstall MariaDB
sudo apt install mariadb-server mariadb-clientJalankan secure installation
mysql_secure_installationOutput: Set password root, sesuikan.
fariz@lamp:~$ sudo mysql_secure_installation

NOTE: RUNNING ALL PARTS OF THIS SCRIPT IS RECOMMENDED FOR ALL MariaDB
      SERVERS IN PRODUCTION USE!  PLEASE READ EACH STEP CAREFULLY!

In order to log into MariaDB to secure it, we'll need the current
password for the root user. If you've just installed MariaDB, and
haven't set the root password yet, you should just press enter here.

Enter current password for root (enter for none):
OK, successfully used password, moving on...

Setting the root password or using the unix_socket ensures that nobody
can log into the MariaDB root user without the proper authorisation.

You already have your root account protected, so you can safely answer 'n'.

Switch to unix_socket authentication [Y/n] y
Enabled successfully!
Reloading privilege tables..
 ... Success!


You already have your root account protected, so you can safely answer 'n'.

Change the root password? [Y/n] y
New password:
Re-enter new password:
Password updated successfully!
Reloading privilege tables..
 ... Success!


By default, a MariaDB installation has an anonymous user, allowing anyone
to log into MariaDB without having to have a user account created for
them.  This is intended only for testing, and to make the installation
go a bit smoother.  You should remove them before moving into a
production environment.

Remove anonymous users? [Y/n] y
 ... Success!

Normally, root should only be allowed to connect from 'localhost'.  This
ensures that someone cannot guess at the root password from the network.

Disallow root login remotely? [Y/n] y
 ... Success!

By default, MariaDB comes with a database named 'test' that anyone can
access.  This is also intended only for testing, and should be removed
before moving into a production environment.

Remove test database and access to it? [Y/n] y
 - Dropping test database...
 ... Success!
 - Removing privileges on test database...
 ... Success!

Reloading the privilege tables will ensure that all changes made so far
will take effect immediately.

Reload privilege tables now? [Y/n] y
 ... Success!

Cleaning up...

All done!  If you've completed all of the above steps, your MariaDB
installation should now be secure.

Thanks for using MariaDB!
Konfigurasi VirtualHost Apache di LAMP
VirtualHost Default Apache
Edit konfigurasi default:
sudo nano /etc/apache2/sites-available/000-default.confTambahkan di bawah DocumentRoot /var/www/html:
<Directory /var/www/html>
    Options Indexes FollowSymLinks MultiViews
    AllowOverride All
    Require all granted
</Directory>

<IfModule mod_dir.c>
    DirectoryIndex index.php index.html index.cgi index.pl index.xhtml index.htm
</IfModule>
Simpan, lalu aktifkan modul rewrite:
sudo a2enmod rewrite
sudo systemctl restart apache2
VirtualHost dengan Domain
Buat Direktori Web.
sudo mkdir /var/www/namadirektoriBuat File Konfigurasi
sudo nano /etc/apache2/sites-available/namakonfigurasi.confIsi:
<VirtualHost *:80>
    ServerName namamdomain.com
    DocumentRoot /var/www/namadirektori

    <Directory /var/www/namadirektori>
        Options Indexes FollowSymLinks MultiViews
        AllowOverride All
        Require all granted
    </Directory>

    ErrorLog /var/log/apache2/namadomain.com_error.log
    CustomLog /var/log/apache2/namadomain.com_access.log combined
</VirtualHost>
Konfigurasi VirtualHost dengan SSL (Jika Menggunakan HTTPS)
Jika sudah memiliki sertifikat SSL (misalnya dari Let’s Encrypt), tambahkan:
<VirtualHost *:443>
    ServerName namadomain.com
    DocumentRoot /var/www/namadirektori

    <Directory /var/www/namadirektori>
        Options Indexes FollowSymLinks MultiViews
        AllowOverride All
        Require all granted
    </Directory>

    ErrorLog /var/log/apache2/namadomain.com_websecure_error.log
    CustomLog /var/log/apache2/namadomain.com_websecure_access.log combined

    SSLEngine on
    SSLCertificateFile /path/to/fullchain.pem
    SSLCertificateKeyFile /path/to/privkey.pem
</VirtualHost>
Mengaktifkan VirtualHost dan Modul yang Diperlukan
Aktifkan modul yang diperlukan.
sudo a2enmod rewrite
sudo a2enmod ssl
sudo systemctl reload apache2
sudo systemctl restart apache2
Verifikasi konfigurasi virtualhost.
sudo apachectl configtestPastikan output dari apachectl configtest adalah:
Syntax OKAktifkan Virtualhost.
sudo a2ensite namakonfigurasi.conf
Reload dan restart service Apache.
sudo systemctl reload apache2
sudo systemctl restart apache2
Instal dan Konfigurasi SSL Let’s Encrypt (Opsional)
Install Let’s Encrypt Certbot
apt install python3-certbot-apache -y certbot --apacheLalu pilih situs yang akan dipasang SSL dengan memasukan nomor pilihan. Jika ada 2 situs yang ingin dipasangkan SSL pisahkan dengan <spasi>
contoh:
Saving debug log to /var/log/letsencrypt/letsencrypt.log

Which names would you like to activate HTTPS for?
- - - - - - - - - - - - - - - - - - - - - - - - - - - - - - - - - - - - - - - -
1: namadomain.com
2: blog.namadomain.com
3: www.blog.namadomain.com
4: www.namadomain.com
- - - - - - - - - - - - - - - - - - - - - - - - - - - - - - - - - - - - - - - -
Select the appropriate numbers separated by commas and/or spaces, or leave input
blank to select all options shown (Enter 'c' to cancel): 1 4
Untuk letsencrypt terbaru tidak terdapat List domain dengan pilihan nomor, jadi kita harus mengetikkan domain secara manual, Dan jika ingin menambahkan lebih dari 1 domain maka harus dipisahkan menggunakan spasi. Contoh:
Please enter the domain name(s) you would like on your certificate (comma and/or
space separated) (Enter 'c' to cancel): farizanwar.my.id www.farizanwar.my.id
Atau dengan perintah berikut
certbot --apache -d namadomain.com -d www.namadomain.comJika muncul pertanyaan
Saving debug log to /var/log/letsencrypt/letsencrypt.log
Plugins selected: Authenticator apache, Installer apache
Enter email address (used for urgent renewal and security notices)
 (Enter 'c' to cancel):
Masukkan email untuk mendapatkan notifikasi jika masa berlaku sertifikat akan berakhir/kadaluwarsa
Jika muncul pertanyaan
Please read the Terms of Service at
https://letsencrypt.org/documents/LE-SA-v1.2-November-15-2017.pdf. You must
agree in order to register with the ACME server. Do you agree?
- - - - - - - - - - - - - - - - - - - - - - - - - - - - - - - - - - - - - - - -
(Y)es/(N)o: Y
Jawab Y
Jika muncul pertanyaan
Would you be willing, once your first certificate is successfully issued, to
share your email address with the Electronic Frontier Foundation, a founding
partner of the Let's Encrypt project and the non-profit organization that
develops Certbot? We'd like to send you email about our work encrypting the web,
EFF news, campaigns, and ways to support digital freedom.
- - - - - - - - - - - - - - - - - - - - - - - - - - - - - - - - - - - - - - - -
(Y)es/(N)o: N
Jawab saja N
Untuk letsencrypt terbaru jika kita menginstal wordpress di default root document/directory apache muncul pertanyaan berikut:
We were unable to find a vhost with a ServerName or Address of www.farizanwar.my.id.
Which virtual host would you like to choose?
- - - - - - - - - - - - - - - - - - - - - - - - - - - - - - - - - - - - - - - -
1: 000-default.conf               |                       |       | Enabled
2: 000-default-le-ssl.conf        | farizanwar.my.id      | HTTPS | Enabled
- - - - - - - - - - - - - - - - - - - - - - - - - - - - - - - - - - - - - - - -
Select the appropriate number [1-2] then [enter] (press 'c' to cancel): 2
Dan kita pilih pilihan yang terdapat tulisan HTTPS, contoh diatas HTTPS terdapat pada nomor 2 maka kita pilih nomor 2
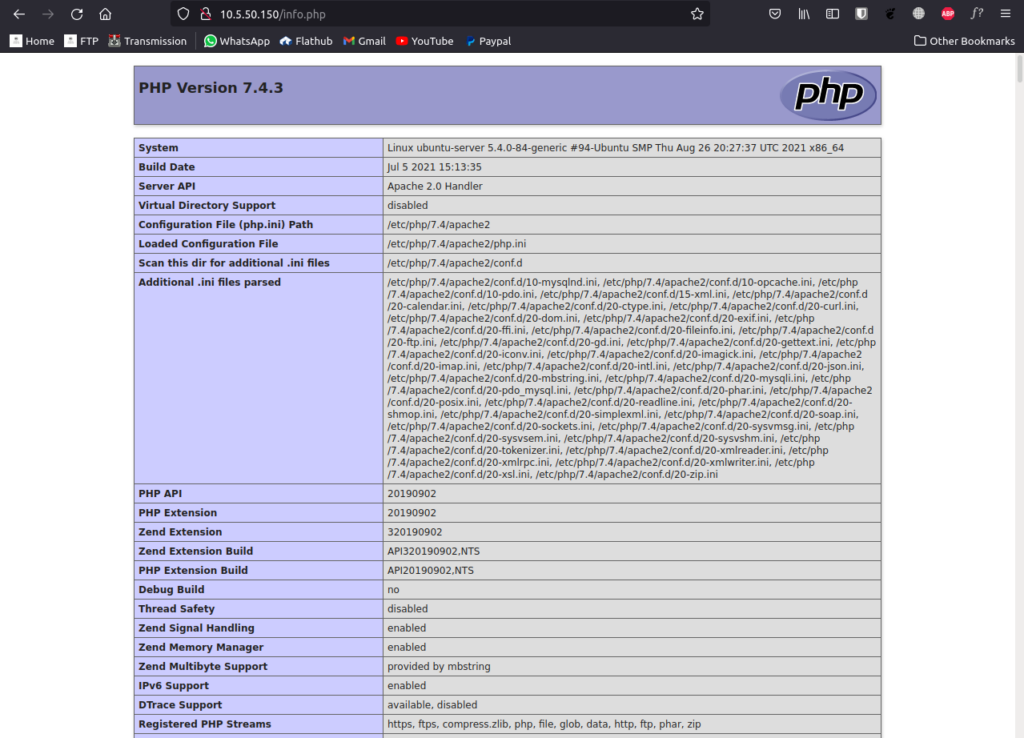
Test konfigurasi Web Server dan PHP
Buat sebuah file php untuk melihat informasi versi php yang dipakai
nano /var/www/namadirektori/info.phpMasukkan ini kedalamnya
<?php phpinfo( ); ?>Lalu akses dengan Web Browser menggunakan IP atau Domain
IPADDRESSatauDOMAIN
IPADDRESSatauDOMAIN/info.php
Hasil yang keluar kurang lebih seperti ini: